


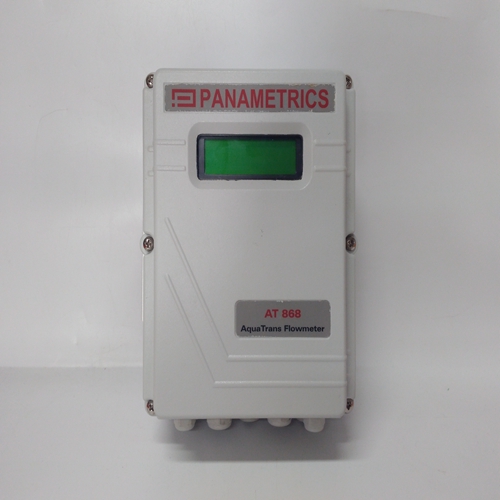

GE AT686W-1-1-1-1便携式温度仪
相位校正程序要求关闭原动机多次断开电流互感器。为方便起见
图3-2所示电流互感器的临时连接方法为:
推荐。连接a 1Ω, 每个电流上的5W负载电阻器
变压器允许电流互感器与端子断开
卸下所有负载后,在原动机运行的情况下进行剥离。
高电压:电流互感器可能会产生危险高电压。不要断开电流互感器
原动机正在运行,除非临时1Ω, 5 W电阻器为:
如图3-2所示安装,并移除所有负载。图3-2变压器相位校正的临时接线
如果上述和图3-2所示的临时负载电阻器为:未使用时,除移除负载外,还必须关闭原动机在以下过程中。
在本步骤中,通过连接电压表测量负载信号电压跨接负载信号端子11(–)和13(+)。
1.关闭原动机。
2.用您认为应该的相位和极性标记每个CT导线。尽管此标识可能被证明不正确,但此步骤是必要时,以便在程序说明。
3.从端子6和7断开B相CT导线。连接这些导线使用小螺钉和螺母将两根电线连接在一起,并用胶带固定连接。
4.从端子8和9上断开C相CT导线。连接并贴上胶带如步骤3所示,将这两条导线连接在一起。
5.将A相CT的两根导线连接到A相输入端子4和5。
6.启动原动机,施加全负荷,测量负荷信号电压。启动列表并记录此电压。7.卸载系统并反转端子4和上的A相CT导线
8.施加全负载,测量负载信号,并记录该电压。
9.卸载系统,从端子4和5上拆下A相CT导线,并将它们连接到B相输入端子6和7*
10.施加全负载,测量负载信号,并记录该电压。
2卸载系统并反转端子6和上的A相CT导线
12.施加全负载,测量负载信号,并记录该电压。
13.卸载系统,从端子6和7上拆下A相CT导线,并将它们连接到C相输入端子8和9*
14.施加全负载,测量负载信号,并记录该电压。
15.卸载系统并反转端子8和上的A相CT导线
16.施加全负载,测量负载信号,并记录该电压。
17.卸载系统并比较六个电压读数*
The Phase Correction Procedure requires that the prime mover be shut down
many times to disconnect the current transformers. For convenience, a
temporary method of connecting the current transformers shown in Figure 3-2 is
recommended. Connecting a 1 Ω, 5 W burden resistor across each current
transformer allows the current transformers to be disconnected from the terminal
strip with the prime mover running, after removing all load.
HIGH VOLTAGE—The current transformers can develop dangerously
high voltages. Do not disconnect a current transformer while the
prime mover is running unless temporary 1 Ω, 5 W resistors are
Installed as shown In Figure 3-2, and all load is removed.
Figure 3-2. Temporary Wiring for Transformer Phase Correction
If the temporary burden resistors described above and shown in Figure 3-2 are
not used, the prime mover MUST be shut down in addition to removing the load
in the following procedure.
Measure the load-signal voltage in this procedure by connecting a voltmeter
across the Load Signal terminals 11 (–) and 13 (+).
1. Shut down the prime mover.
2. Label each CT wire with the phase and polarity that you think it should be.
Even though this identification may prove to be incorrect, this step is
necessary so that the individual wires may be identified during the
description of the procedure.
3. Disconnect the phase B CT wires from terminals 6 and 7. Connect these
two wires together using a small screw and nut, and tape the connection.
4. Disconnect the phase C CT wires from terminals 8 and 9. Connect and tape
these two wires together as in step 3.
5. Connect the two wires from the phase A CT to the phase A input terminals 4
and 5.
6. Start the prime mover, apply full load, and measure the load signal voltage.
Start a list and record this voltage. 7. Unload the system and reverse the phase A CT wires on terminals 4 and
5. *
8. Apply full load, measure the load signal, and record this voltage.
9. Unload the system, remove the phase A CT wires from terminals 4 and 5,
and connect them to phase B input terminals 6 and 7. *
10. Apply full load, measure the load signal, and record this voltage.
11. Unload the system and reverse the phase A CT wires on terminals 6 and
7. *
12. Apply full load, measure the load signal, and record this voltage.
13. Unload the system, remove the phase A CT wires from terminals 6 and 7,
and connect them to phase C input terminals 8 and 9. *
14. Apply full load, measure the load signal, and record this voltage.
15. Unload the system and reverse the phase A CT wires on terminals 8 and
9. *
16. Apply full load, measure the load signal, and record this voltage.
17. Unload the system and compare the six voltage readings. *

